
|
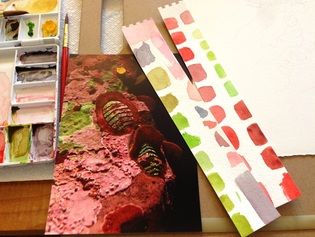
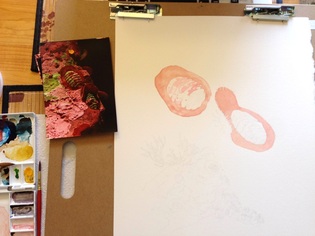
Today was the last day of a two week marine science illustration class at California State University Monterey Bay. I learned so much in the last two weeks. The class was designed to teach us how to use watercolors to paint marine subjects. It was very intense and I was surprised how exhausted I was after every class period from concentrating so hard on very small details in my piece. I took photos along the way so I can show you all the progression from inspiration to final painting. 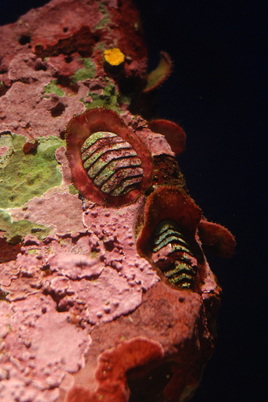 On the second day of class, we took a field trip to the Monterey Bay Aquarium for inspiration. I have always loved the Monterey Bay habitat tanks that are filled with pink anemones and covered in pink coralline algae. My goal for this class was to pick a subject where I could show an environmental context for the organism. I was really interested in a species of chiton that I had never known about before. This is a carnivorous chiton, Placiphorella velata. It sits on the rocks much like a limpet, and puts up an extended girdle, or veil. When a worm crawls across specialized precephalic tentacles, it snaps down quickly over the animal and traps it!  First, we produced detailed line drawings of our organisms, scanned them, and arranged them in Adobe Photoshop. This was very helpful because I was able to use the computer to arrange and resize the line drawings into the composition I liked best. We then printed out our line drawings and transferred them onto our watercolor paper using carbon paper. The next step was to figure out the colors. Here is where I learned the most. Using test strips and printouts of my reference photos, I was able to experiment with colors. Test strips allowed me to put my paint colors directly next to the photos and see how well they matched. It was surprising how many different purples, greens, blues, and magentas are in patches that seemed to be just pink!
Then it was on to experimenting with fadeouts, shadow colors, and level of detail that I want in the final painting. Here, I was trying to decide whether to fade out the rock to light watercolors or to pencil. (I picked the one on the left). 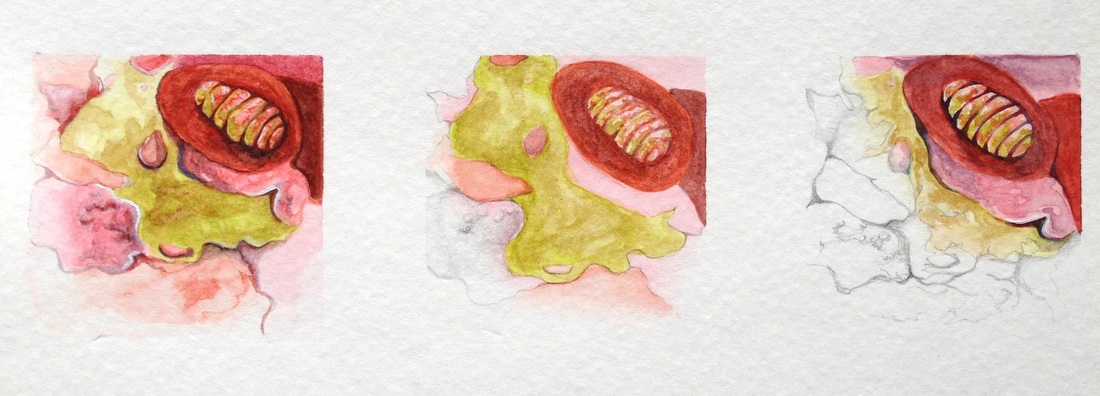
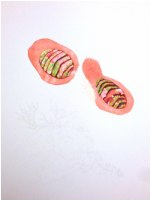
Then, it was days of layer, layer, layer!
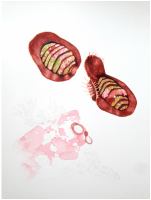
At last, it was time for the final touches. Darkening the shadows, adding some very dark "divets of darkness" helped make the crustose coralline algae pop. Adding a little bright white guache also helped add contrast to the final painting and made the anemones stand out. The very last thing I did was add some very fine graphite lines in some of the subtle areas of the branching coralline algae. Thanks, Logan Parsons, our wonderful instructor, for teaching us some really great techniques! 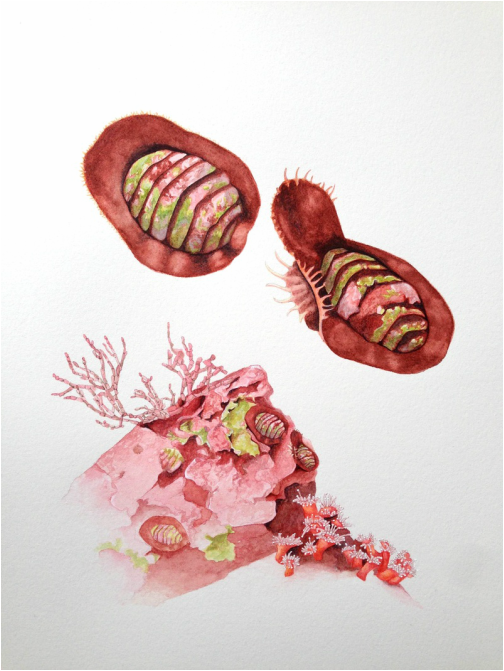
1 Comment
Sandra Culliton
8/3/2013 12:50:38 pm
Absolutely beautiful! I love how you gave the step by step process, as others can learn from your work. I just stumbled across your blog, and this is definitely one I'll follow :) Keep up the great work! Your comment will be posted after it is approved.
Leave a Reply. |
Categories
All
|

 RSS Feed
Proudly powered by Weebly